I'm writing this up because I thought I could figure this out myself....boy was I wrong. I should note that this is a guide and may not be complete (but is to the best of my knowledge). If you are not mechically inclined or have misgivings about completing this yourself, leave it to a professional. I'd like to start by thanking the people who helped me:
- Mikey - Who could ask for a better father-in-law!
- Chris Green of TX - The man with the answers....need I say more of him?
- Adam Garrett - For giving me CG's number
- Jeremy Flowers - That hub did come off eventually.
- Chris White - Thanks for calming me down!
- Tony Lauer - Dude....when you're in the water, it's not necessary to answer the phone!
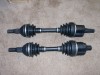
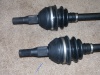
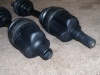
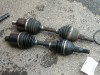
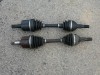
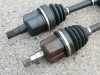
You can get new, OEM half-shafts from your dealer (over $450 each) or remanufactured units from your local NAPA or Advanced Auto Parts (about $80 each). I purchased a reinforced set (DS and PS) from South Florida Pulley HQ for $250. Compared to OEM, they look pretty-much the same. The boots are made of heavier rubber and have rounded pleats. Here's a few pictures of the SFPHQ half-shafts.
[ 61K ] | [206K ]
[ 69K ] | [259K ]
[ 58K ] | [203K ]
During the installation I came up with a list of tools that you'll need. This isn't the end-all-be-all list of tools, but should complete the job.
- Safety Goggles or Glasses (just in case)
- Mechanix Gloves (makes work easier)
- Hydraulic Floor Jack
- Adjustable Jackstand
- Lug Nut Wrench
- 1/2" Ratchet or Breaker Bar with a cheater pipe or an 1/2" Impact Wrench
- 3/8" Ratchet (if you have sockets that need it)
- 36mm Axle Socket
- 15mm Socket
- 13/16" Socket
- 13/16" Open-End Wrench or Crescent Wrench
- Hammer
- 2ft section of pipe (at least 1/2" o.d.)
[ 63K ] | [230K ]
[ 64K ] | [235K ]
[ 60K ] | [190K ]
[ 66K ] | [221K ]
[ 63K ] | [212K ]
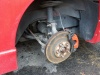
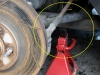
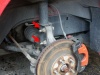
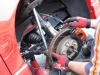
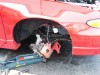
Remove the lower strut bolts with the 13/16" socket and open end wrench (or cresent wrench). The bolts are marker in the left-hand picture below with arrows. The will probably not come all the way out with the pressure of the spring against them. We used a pipe and the hydraulic floor jack (middle) to press up on the strut to relieve the pressure on the lower bolts. You can see how we positioned the pipe in the right-hand picture below.
[ 82K ] | [283K ]
[146K ] | [490K ]
[ 44K ] | [230K ]
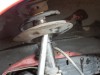
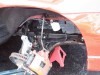
Now that the area is clear to work, it's time for the half-shaft to come out. The transmission end passenger-side shaft is "male", and the driver-side is "female". To get the shaft out of the transmission, grab the "bucket" and the end near the transmission and pull. There is a "C" clip inside that will keep it from pooping out instantly. It took me about 5 mints of tugging and pulling to free mine. Once it releases, it's really easy.
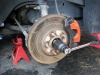
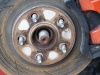
There should be enough room to pull clear of the transmission. Move the bucket towards the back of the tranny and then behind it. That should allow the hub-end of the half-shaft to come completely out of the hub. If it doesn't come out, you might need to tap the shaft out of the hub with a hammer. The middle and right picture are with the half-shaft removed.
[ 76K ] | [273K ]
[ 64K ] | [225K ]
[ 60K ] | [204K ]
Now put the strut assembly back in and tighten down the top three nuts to hold it in place. Using the floor jack and pipe, compress the strut a bit and line up the lower strut bolt holes in the knuckle with the strut assembly. Insert the lower strut bolts and tighten them down. Now you can release the floor jack and remove the pipe.
Finish torquing the axle nut to 118 ft. lbs. Double-check the nuts on the strut tower and lower strut bolts. Jack up the car normally and remove the jackstand from the subframe. Put the wheel back on and torque the lug nuts to 100 ft. lbs.
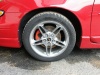
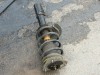
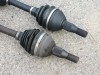
That's it. Make sure to take your car for a test drive. Here are some comparison pics between the original half-shafts, and the ones from SFPHQ.
[ 84K ] | [301K ]
[ 83K ] | [334K ]
[ 82K ] | [302K ]
[ 82K ] | [314K ]